There’s a fine line between pushing your body to achieve new running goals, and over-reaching your way into injury. Experienced athletes will tell you that one of the most important skills to master is the art of self-maintenance; time spent looking after your body properly between runs will pay dividends in the long term.
One major way to do so? Self-myofascial release of your calves. The foam roller is perhaps the easiest way to do so. But what’s the right way to do it? I’ve found a three-step process for foam rolling my calves that I’ve found to be massively helpful.
How to Foam Roll Your Calf Muscles
If you’re prone to Achilles tendon problems, calf pain after running or even injuries like shin splints and plantar fasciitis, you will likely benefit from regular foam rolling to promote good soft tissue health of your calf muscles.
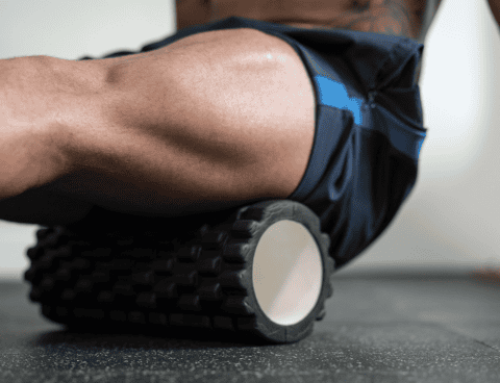
The video above is a step-by-step tutorial on how to foam roll your calves. There are a number of techniques you can use on the foam roller to self-massage tight calf muscles and help prevent a little acute tightness from turning into a bigger issue.
Let’s look closer look at the three-step process for relieving tight calves with a foam roller.
1. Warm-Up: Long Gliding Strokes
It’s important not to approach your foam rolling too aggressively. As with any other form of exercise, your body (and specifically the calf tissue) needs a chance to warm up.
The first foam rolling technique shown in the video uses long gliding strokes up and down the full length of the calf region, adjusting positions to reach not only gastrocnemius and soleus muscles but also the peroneal muscles and tibialis posterior.
These light, quick and comparatively gentle strokes are similar to the traditional massage technique “effleurage” which is used to promote blood flow to the region and warm up the tissues in preparation for more aggressive techniques to come.
2. Cross Friction Technique
This foam-rolling technique is similar to what you may have experienced during a sports massage, where the massage therapist spends time working intensively with their thumbs on a specific point, to release a trigger-point or “knot,” or to break up an area of scar tissue.
In comparison to the long strokes from the first stage, with the movement following the alignment of the muscle fibers, this cross friction technique works on a very targeted area, in a back-and-forth movement perpendicular to the muscle fibers. The pressure should be intense and perhaps a bit uncomfortable, but not painful or sharp in nature.
You should use this technique on any particularly tender areas or trigger points you find in your calves during the first stage of this routine. However, be sure not to use this on the site of an acute injury like a calf muscle tear.
3. Active Release Technique
This third and final technique for foam rolling your calf muscles is similar to the cross friction technique in that you’ll focus on any areas of tightness, or trigger points you find. However, this time you will simply be applying pressure on the muscle while you work the ankle through its full range of motion, into dorsiflexion and plantar flexion.
As with all foam rolling techniques, you shouldn’t apply so much pressure that you question whether or not you’re doing yourself more harm than good. The aim isn’t to inflict intense pain, just to apply pressure while working through a range of movements.
I’ve found this three-step strategy to be a fantastic way to reduce calf tightness the morning after a long run or speed workout. If you happen to have any other cranky areas that can benefit from foam rolling, check out STACK’s definitive guide on the topic.
READ MORE:
RECOMMENDED FOR YOU


MOST POPULAR


There’s a fine line between pushing your body to achieve new running goals, and over-reaching your way into injury. Experienced athletes will tell you that one of the most important skills to master is the art of self-maintenance; time spent looking after your body properly between runs will pay dividends in the long term.
One major way to do so? Self-myofascial release of your calves. The foam roller is perhaps the easiest way to do so. But what’s the right way to do it? I’ve found a three-step process for foam rolling my calves that I’ve found to be massively helpful.
How to Foam Roll Your Calf Muscles
If you’re prone to Achilles tendon problems, calf pain after running or even injuries like shin splints and plantar fasciitis, you will likely benefit from regular foam rolling to promote good soft tissue health of your calf muscles.
The video above is a step-by-step tutorial on how to foam roll your calves. There are a number of techniques you can use on the foam roller to self-massage tight calf muscles and help prevent a little acute tightness from turning into a bigger issue.
Let’s look closer look at the three-step process for relieving tight calves with a foam roller.
1. Warm-Up: Long Gliding Strokes
It’s important not to approach your foam rolling too aggressively. As with any other form of exercise, your body (and specifically the calf tissue) needs a chance to warm up.
The first foam rolling technique shown in the video uses long gliding strokes up and down the full length of the calf region, adjusting positions to reach not only gastrocnemius and soleus muscles but also the peroneal muscles and tibialis posterior.
These light, quick and comparatively gentle strokes are similar to the traditional massage technique “effleurage” which is used to promote blood flow to the region and warm up the tissues in preparation for more aggressive techniques to come.
2. Cross Friction Technique
This foam-rolling technique is similar to what you may have experienced during a sports massage, where the massage therapist spends time working intensively with their thumbs on a specific point, to release a trigger-point or “knot,” or to break up an area of scar tissue.
In comparison to the long strokes from the first stage, with the movement following the alignment of the muscle fibers, this cross friction technique works on a very targeted area, in a back-and-forth movement perpendicular to the muscle fibers. The pressure should be intense and perhaps a bit uncomfortable, but not painful or sharp in nature.
You should use this technique on any particularly tender areas or trigger points you find in your calves during the first stage of this routine. However, be sure not to use this on the site of an acute injury like a calf muscle tear.
3. Active Release Technique
This third and final technique for foam rolling your calf muscles is similar to the cross friction technique in that you’ll focus on any areas of tightness, or trigger points you find. However, this time you will simply be applying pressure on the muscle while you work the ankle through its full range of motion, into dorsiflexion and plantar flexion.
As with all foam rolling techniques, you shouldn’t apply so much pressure that you question whether or not you’re doing yourself more harm than good. The aim isn’t to inflict intense pain, just to apply pressure while working through a range of movements.
I’ve found this three-step strategy to be a fantastic way to reduce calf tightness the morning after a long run or speed workout. If you happen to have any other cranky areas that can benefit from foam rolling, check out STACK’s definitive guide on the topic.
READ MORE: