5 Reasons Your Push-Ups Are Probably Garbage (and How to Fix Them)
The Push-Up is one of the first exercises humans learn.
It’s for this very reason most people assume they do Push-Ups correctly. In reality, however, there are very few people and very few athletes who perform Push-Ups well.
The Push-Up can also be challenging to correct, because most athletes have been performing Push-Ups for so long that they have deeply engrained poor habits. We’re talking about trying to undo thousands upon thousands of reps performed with poor form.
There are countless Push-Up variations, but this article will hone in on five common flaws in the standard Push-Up as well as cues to fix those flaws. It is important to note that most people have more than one of the following errors present in their Push-Up. I’ve listed these five errors in order of their significance—No. 1 should should take precedence in being corrected before No. 2, and two over three, and so on. It’s difficult to correct multiple errors at the same time, so I recommend correcting one error before moving on to the next.
With that in mind, here are five ways you’re botching Push-Ups, and the steps you can take to work towards a picture perfect version.
Error 1: The Hips Drop
This is the most common error I see in the weight room.
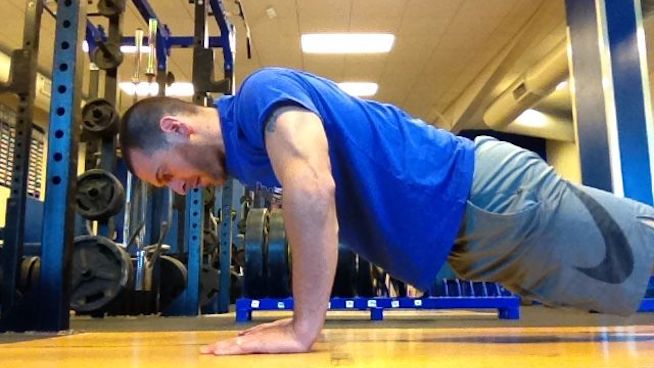
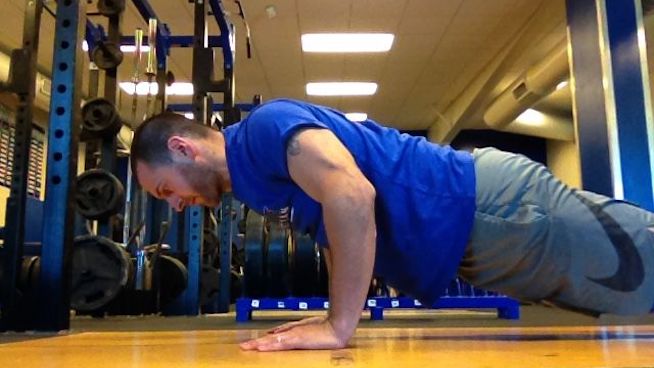
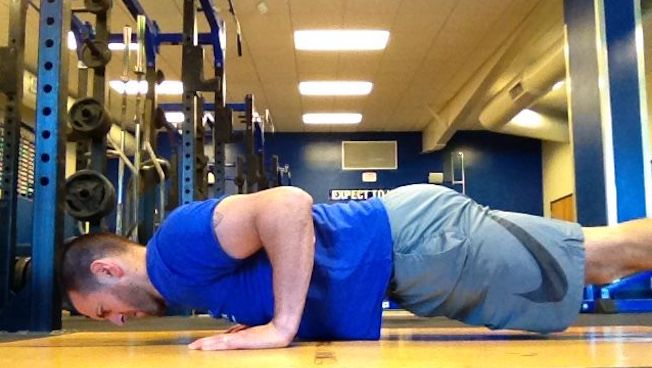
The hips dropping increases the load on the lumbar spine and decreases the activation of the core musculature. The Push-Up is designed to train the core, but this error puts the low back in a vulnerable position. The reason people will let their hips drop is because it changes the angle of the torso and makes the Push-Up easier.
This change is comparable to the difference between the flat and decline bench. The Decline Bench puts you in a better position to move more weight because the angle of the bench reduces the required range of motion. The bar comes in contact with the athletes torso lower than it does on a flat bench press. Compare this to an Incline Bench Press, which is a harder variation than the flat bench where the bar makes contact higher up on the torso.
Now think about the ground as the bar in a Push-Up. In a proper Push-Up, the chest is the only portion of the athlete’s upper body that should touch the ground, but when an athlete lets their hips drop, the pelvis or stomach come into contact with the ground prior to the chest. This makes it easier to push yourself back up. This error is perhaps most commonly found in those first learning to do a Push-Up, but it is not exclusively found in beginners. I have seen many well-trained athletes who have engrained a slight drop in their hips because when they were learning the move this subtle change allowed them to perform more reps. This error will many times be slight and takes a keen eye to notice, but any deviation from neutral spinal alignment will increase low-back stress and reduce Push-Up intensity.
In the below photos, picture one features a slight drop of the hips. Picture two features a drastic drop of the hips. And picture three features proper hip alignment:
It’s subtle, but it’s very important. So, how do we fix this?
Engage the core at the start of the movement. Take the time to stabilize your spine in a neutral position before beginning the set of Push-Ups. Next time you perform a Push-Up, go through this mental checklist before you begin:
- Feet should be actively pressing together.
- Glutes should be squeezed.
- Top of your belly button “pulled in” with your abs activated
- Shoulders slightly externally rotated and chin slightly tucked
If you have been doing Push-Ups without engaging your core, this will make your Push-Ups significantly more challenging. Don’t assume you’ll be able to assume your normal sets and reps after making this change. Take each rep one at a time and figure out what schemes allow you to both push yourself and not break form. If you find the move too difficult after this fix, perform Push-Ups with your hands elevated on a surface and slowly work your way to the ground.
Error 2: Bad Hand Placement
There are countless variations of Push-Ups, and the majority of them will adjust the hand position.
There is a time and a place for such variations, but every athlete should be able to perform the standard Push-Up properly first. Many weaker athletes will adopt the wide hand position, because it is an easier variation. The problem is that it does not have much of a transfer to pushing during athletic activities. Similarly, I have seen plenty of athletes have their hands too narrow. Tricep Push-Ups are great, but they should not your primary push-up.
Another common issue with hand placement is to have the hands higher than the shoulders. This is the most dangerous hand position and can lead to shoulder impingement if not corrected. Picture one shows hands which are too tight, picture two shows hands which are too wide, and picture three shows proper hand positioning:
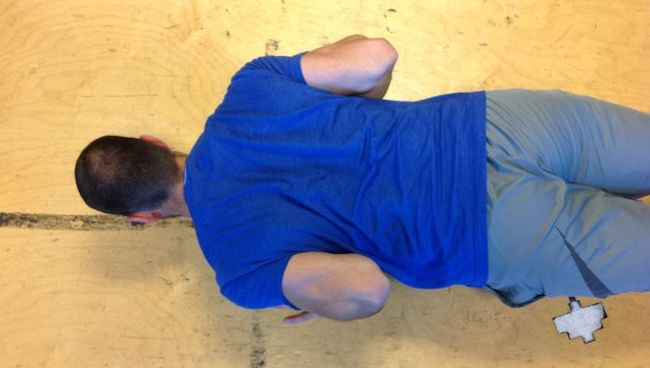
How do we fix this issue? It’s all about the set-up.
Hands should be placed slightly outside of and in line with your shoulders. As you descend, your body comes slightly forward, and your hands will be lower than your shoulders.
Error 3: Your Elbows Are All Over the Place
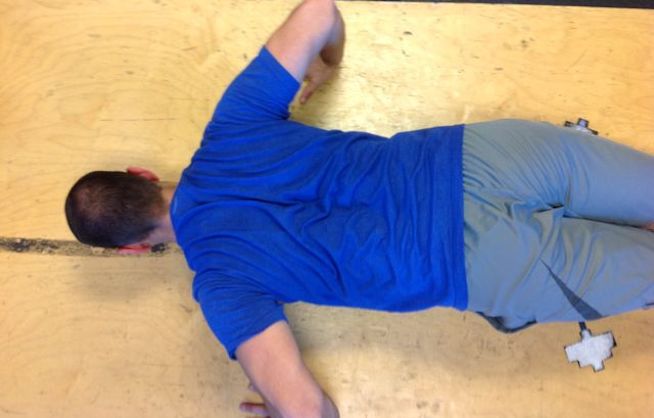
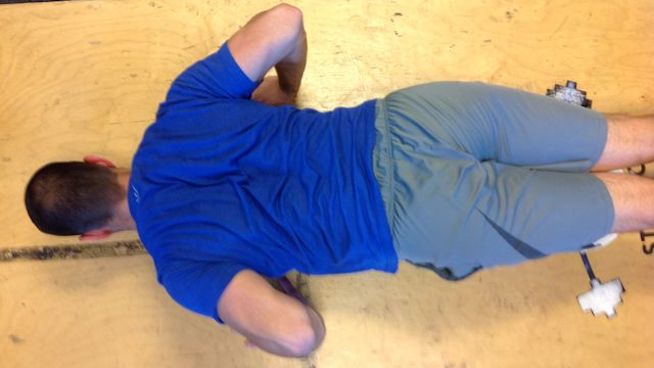
This goes right along with hand placement, and many times, if you correct the hand placement, then this problem goes away. By elbows “going all over the place,” I mean your elbows are either flaring too far out or staying painfully tight to the torso. Photo one shows the elbows too wide, photo two shows too narrow, and photo three shows them just right:
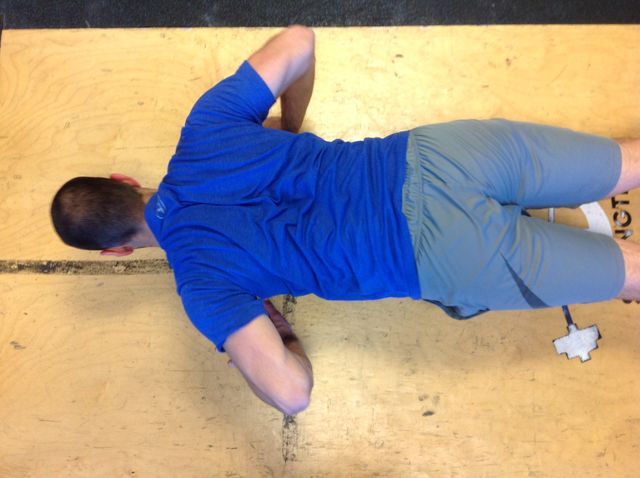
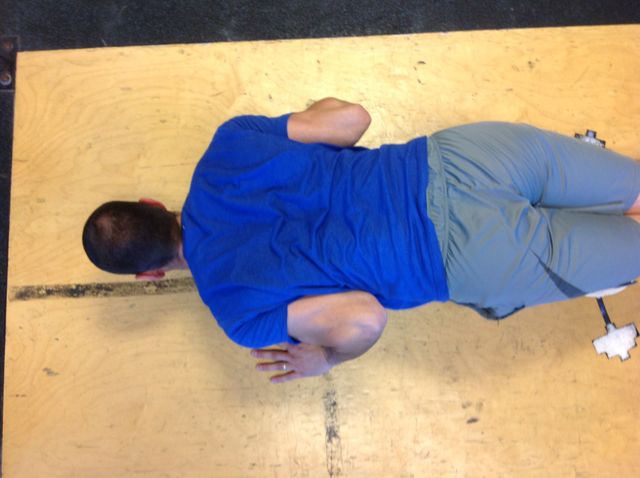

During the Push-Up, only the elbow and shoulder joints should be moving, but these errors in elbow positioning cause harmful movement at the wrist. To avoid this, the forearm should remain vertical for every push-up repetition. Thus, the body must come slightly forward, and the elbows should be at about a 30- to 45-degree angle from the torso.
The fix is to stand up and pretend you’re preparing to push someone. In the vast majority of cases, the way you set up to push someone is the same position you should be in at the bottom of the push-up. Find that sweet spot between the wide Push-Up and the Tricep-Up. This makes the Push-Up a functional press that transfers better to sport.
Error 4: Wandering Eyes
This error will commonly occur if the individual can see their reflection by looking forward or to the side. They like to look at themselves doing Push-Ups, but they forget that their neck is a part of their spine.
In the same way that you should not overextend or round your thoracic or lumbar spine during exercise, you should avoid doing this in your cervical spine (neck). The cervical vertebrae are smaller and weaker than the other vertebrae because they do not take as much of the body load. This means they are more susceptible to injury if they are put in vulnerable positions. Looking to your side during any exercise is unadvisable, because looking sideways causes the athlete to shift their weight away from the direction their eyes go. This means that if you are looking to the right, your left arm will take more of the load in the Push-Up, and vice versa. This can lead to muscular imbalances when done consistently.
The first photo shows forward head error, the second photo shows a side head error, and the third photo shows proper neck position:
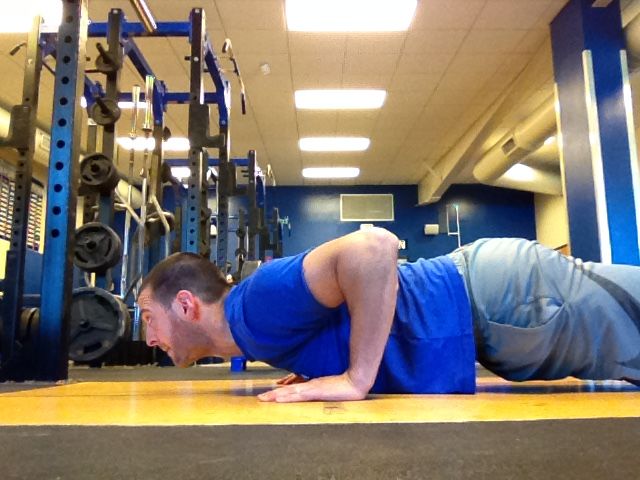
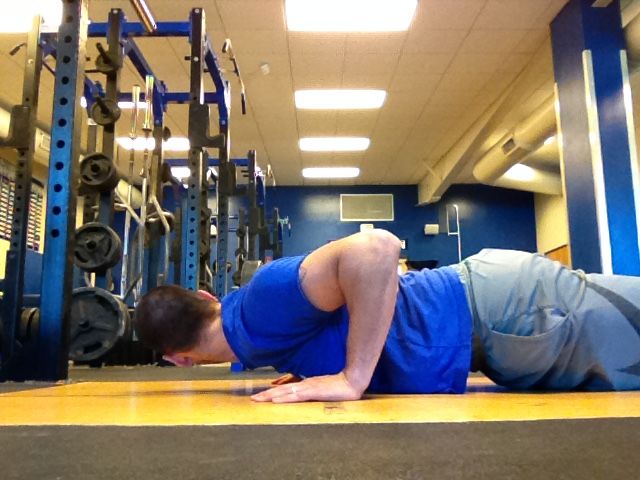
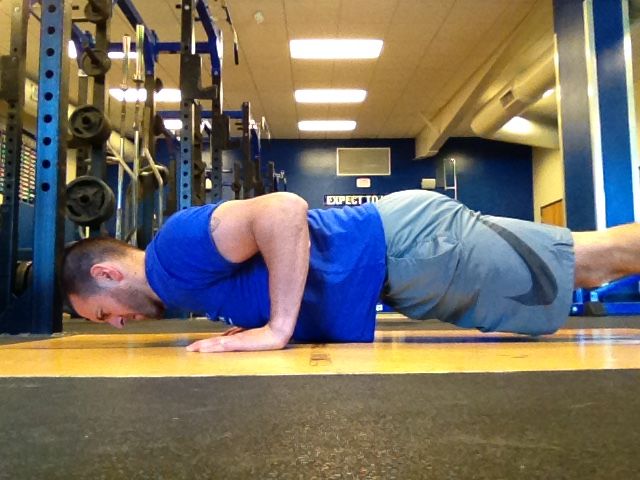
Fortunately, this one is an easy fix that most people can make immediately. To fix this, tuck your chin like you are attempting to make a double chin and look straight down throughout the movement.
Error 5: Range of Motion
Similar to the first error, this is found in both novice and elite athletes alike.
The novice takes time to develop the strength to perform repetitions at a full range of motion, and I would recommend starting with your hands elevated.
For a well-trained athlete, though, this is primarily an issue of ego. The mindset of most athletes is quantity over quality. This can go for any lift, but it’s perhaps never more evident than with Push-Ups. I have had countless athletes tell me they can do 80, 90, 100-plus Push-Ups in a row only to watch them perform 90-degree Push-Up pulses instead of actual reps. Many athletes avoid the end ranges when performing Push-Ups. They avoid locking out and would not dream of going below 90 degrees. While the number of Push-Ups such athletes can perform may be impressive, the adaptations gained from those Push-Ups may not be. I would much rather see 10-20 high-quality Push-Ups than 100 mediocre ones.
How do you fix this? You must decide that every rep needs to finish with the arms locked out (and ideally the scapulas protracted). Depth should be as close as you can get to the ground while maintaining proper spinal alignment.
Although the Push-Up is one of the first exercises most human beings learn, don’t assume you have it mastered. Remember, the above errors are listed in order of their importance, so tackle them one at a time, and watch your Push-Ups start getting the results they’re supposed to.
Photo Credit: JohnnyGreig/iStock
READ MORE FROM MATTHEW KORMAN:
RECOMMENDED FOR YOU
MOST POPULAR
5 Reasons Your Push-Ups Are Probably Garbage (and How to Fix Them)
The Push-Up is one of the first exercises humans learn.
It’s for this very reason most people assume they do Push-Ups correctly. In reality, however, there are very few people and very few athletes who perform Push-Ups well.
The Push-Up can also be challenging to correct, because most athletes have been performing Push-Ups for so long that they have deeply engrained poor habits. We’re talking about trying to undo thousands upon thousands of reps performed with poor form.
There are countless Push-Up variations, but this article will hone in on five common flaws in the standard Push-Up as well as cues to fix those flaws. It is important to note that most people have more than one of the following errors present in their Push-Up. I’ve listed these five errors in order of their significance—No. 1 should should take precedence in being corrected before No. 2, and two over three, and so on. It’s difficult to correct multiple errors at the same time, so I recommend correcting one error before moving on to the next.
With that in mind, here are five ways you’re botching Push-Ups, and the steps you can take to work towards a picture perfect version.
Error 1: The Hips Drop
This is the most common error I see in the weight room.
The hips dropping increases the load on the lumbar spine and decreases the activation of the core musculature. The Push-Up is designed to train the core, but this error puts the low back in a vulnerable position. The reason people will let their hips drop is because it changes the angle of the torso and makes the Push-Up easier.
This change is comparable to the difference between the flat and decline bench. The Decline Bench puts you in a better position to move more weight because the angle of the bench reduces the required range of motion. The bar comes in contact with the athletes torso lower than it does on a flat bench press. Compare this to an Incline Bench Press, which is a harder variation than the flat bench where the bar makes contact higher up on the torso.
Now think about the ground as the bar in a Push-Up. In a proper Push-Up, the chest is the only portion of the athlete’s upper body that should touch the ground, but when an athlete lets their hips drop, the pelvis or stomach come into contact with the ground prior to the chest. This makes it easier to push yourself back up. This error is perhaps most commonly found in those first learning to do a Push-Up, but it is not exclusively found in beginners. I have seen many well-trained athletes who have engrained a slight drop in their hips because when they were learning the move this subtle change allowed them to perform more reps. This error will many times be slight and takes a keen eye to notice, but any deviation from neutral spinal alignment will increase low-back stress and reduce Push-Up intensity.
In the below photos, picture one features a slight drop of the hips. Picture two features a drastic drop of the hips. And picture three features proper hip alignment:


It’s subtle, but it’s very important. So, how do we fix this?
Engage the core at the start of the movement. Take the time to stabilize your spine in a neutral position before beginning the set of Push-Ups. Next time you perform a Push-Up, go through this mental checklist before you begin:
- Feet should be actively pressing together.
- Glutes should be squeezed.
- Top of your belly button “pulled in” with your abs activated
- Shoulders slightly externally rotated and chin slightly tucked
If you have been doing Push-Ups without engaging your core, this will make your Push-Ups significantly more challenging. Don’t assume you’ll be able to assume your normal sets and reps after making this change. Take each rep one at a time and figure out what schemes allow you to both push yourself and not break form. If you find the move too difficult after this fix, perform Push-Ups with your hands elevated on a surface and slowly work your way to the ground.
Error 2: Bad Hand Placement
There are countless variations of Push-Ups, and the majority of them will adjust the hand position.
There is a time and a place for such variations, but every athlete should be able to perform the standard Push-Up properly first. Many weaker athletes will adopt the wide hand position, because it is an easier variation. The problem is that it does not have much of a transfer to pushing during athletic activities. Similarly, I have seen plenty of athletes have their hands too narrow. Tricep Push-Ups are great, but they should not your primary push-up.
Another common issue with hand placement is to have the hands higher than the shoulders. This is the most dangerous hand position and can lead to shoulder impingement if not corrected. Picture one shows hands which are too tight, picture two shows hands which are too wide, and picture three shows proper hand positioning:


How do we fix this issue? It’s all about the set-up.
Hands should be placed slightly outside of and in line with your shoulders. As you descend, your body comes slightly forward, and your hands will be lower than your shoulders.
Error 3: Your Elbows Are All Over the Place
This goes right along with hand placement, and many times, if you correct the hand placement, then this problem goes away. By elbows “going all over the place,” I mean your elbows are either flaring too far out or staying painfully tight to the torso. Photo one shows the elbows too wide, photo two shows too narrow, and photo three shows them just right:


During the Push-Up, only the elbow and shoulder joints should be moving, but these errors in elbow positioning cause harmful movement at the wrist. To avoid this, the forearm should remain vertical for every push-up repetition. Thus, the body must come slightly forward, and the elbows should be at about a 30- to 45-degree angle from the torso.
The fix is to stand up and pretend you’re preparing to push someone. In the vast majority of cases, the way you set up to push someone is the same position you should be in at the bottom of the push-up. Find that sweet spot between the wide Push-Up and the Tricep-Up. This makes the Push-Up a functional press that transfers better to sport.
Error 4: Wandering Eyes
This error will commonly occur if the individual can see their reflection by looking forward or to the side. They like to look at themselves doing Push-Ups, but they forget that their neck is a part of their spine.
In the same way that you should not overextend or round your thoracic or lumbar spine during exercise, you should avoid doing this in your cervical spine (neck). The cervical vertebrae are smaller and weaker than the other vertebrae because they do not take as much of the body load. This means they are more susceptible to injury if they are put in vulnerable positions. Looking to your side during any exercise is unadvisable, because looking sideways causes the athlete to shift their weight away from the direction their eyes go. This means that if you are looking to the right, your left arm will take more of the load in the Push-Up, and vice versa. This can lead to muscular imbalances when done consistently.
The first photo shows forward head error, the second photo shows a side head error, and the third photo shows proper neck position:


Fortunately, this one is an easy fix that most people can make immediately. To fix this, tuck your chin like you are attempting to make a double chin and look straight down throughout the movement.
Error 5: Range of Motion
Similar to the first error, this is found in both novice and elite athletes alike.
The novice takes time to develop the strength to perform repetitions at a full range of motion, and I would recommend starting with your hands elevated.
For a well-trained athlete, though, this is primarily an issue of ego. The mindset of most athletes is quantity over quality. This can go for any lift, but it’s perhaps never more evident than with Push-Ups. I have had countless athletes tell me they can do 80, 90, 100-plus Push-Ups in a row only to watch them perform 90-degree Push-Up pulses instead of actual reps. Many athletes avoid the end ranges when performing Push-Ups. They avoid locking out and would not dream of going below 90 degrees. While the number of Push-Ups such athletes can perform may be impressive, the adaptations gained from those Push-Ups may not be. I would much rather see 10-20 high-quality Push-Ups than 100 mediocre ones.
How do you fix this? You must decide that every rep needs to finish with the arms locked out (and ideally the scapulas protracted). Depth should be as close as you can get to the ground while maintaining proper spinal alignment.
Although the Push-Up is one of the first exercises most human beings learn, don’t assume you have it mastered. Remember, the above errors are listed in order of their importance, so tackle them one at a time, and watch your Push-Ups start getting the results they’re supposed to.
Photo Credit: JohnnyGreig/iStock
READ MORE FROM MATTHEW KORMAN:


