Scoring the Basketball: 4 Keys to Sinking More Floaters
As basketball has evolved, the floater has become a lethal weapon in the paint for players of all sizes and positions.
There are three basic types of floater shots: a floater off one foot, a floater off two feet, and a Eurostep floater. Out of these three, the two-foot floater is the one that allows for maximum control. The reason is simple: landing on both feet gives you extra time to read the defense and allows you to generate more power for your jump. To have a high percentage two-foot floater, it takes much more than just working on the arc of the shot. Let’s break down four keys to helping you make this shot an essential part of your scoring arsenal.[instagram src=”https://www.instagram.com/p/BfYSNKEjF6B/”]
1. Reduce Your Ground Contact Time
In the game, you want to move as efficiently as possible. That’s why paying attention to such details as ground contact can be a game changer. As soon as you plant your feet and stop, you should be able to jump or make an extra step in any direction. The quicker you can make that jump or extra step, the shorter your ground contact time will, and the less time the defense will have to react to your move and stifle your shot.
2. Build Balance With Your Footwork
The more footwork patterns you own, the harder you are to guard. When elevating for a two-foot floater, you can precede that by stepping left-right, right-left, or executing a jump stop. The most important part of footwork is balance. If you can take pressure off your knees and keep your center of gravity in the middle of your body when stopping in and around the paint, you’ll have greater balance and be able to execute moves quicker and more efficiently.
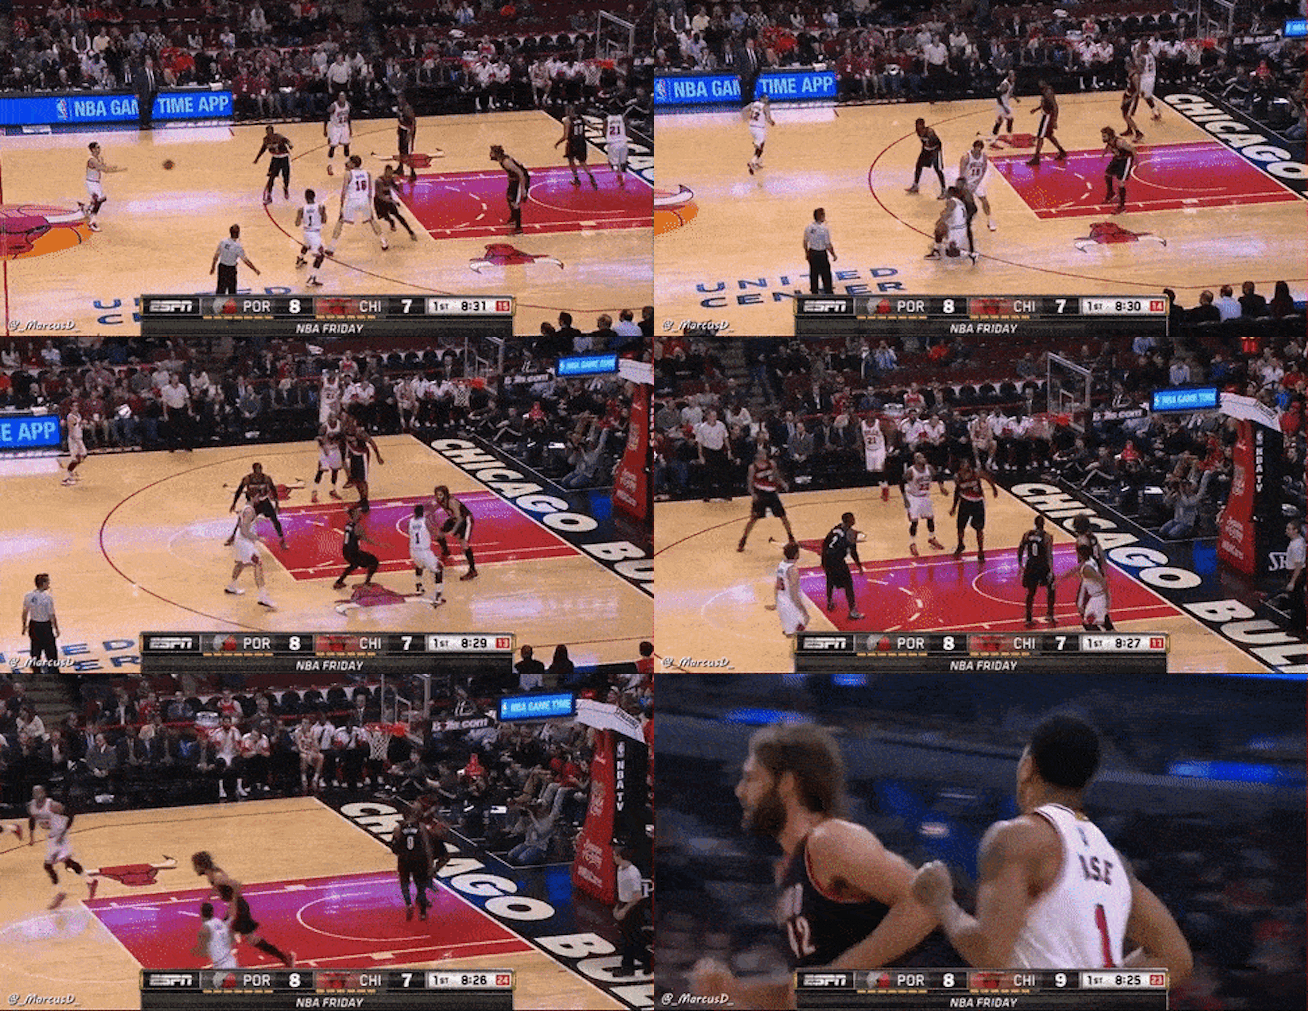
In the above play, you can clearly see that as soon as Derrick Rose planted his feet, he was ready to push off efficiently with minimal ground contact.
3. Work on a High Ball Release
If you release your floater too low, the odds of your shot being blocked are greatly increased. Aiming to release the ball around your forehead is a perfect goal. Floaters are mostly used when you have blown by your defender and you see help-side big man coming to contest your shot. Keeping that in mind, you also want to release the ball while you’re on your way up into your jump. If you hold the ball too long, you’re giving defenders more time to block or alter your shot.
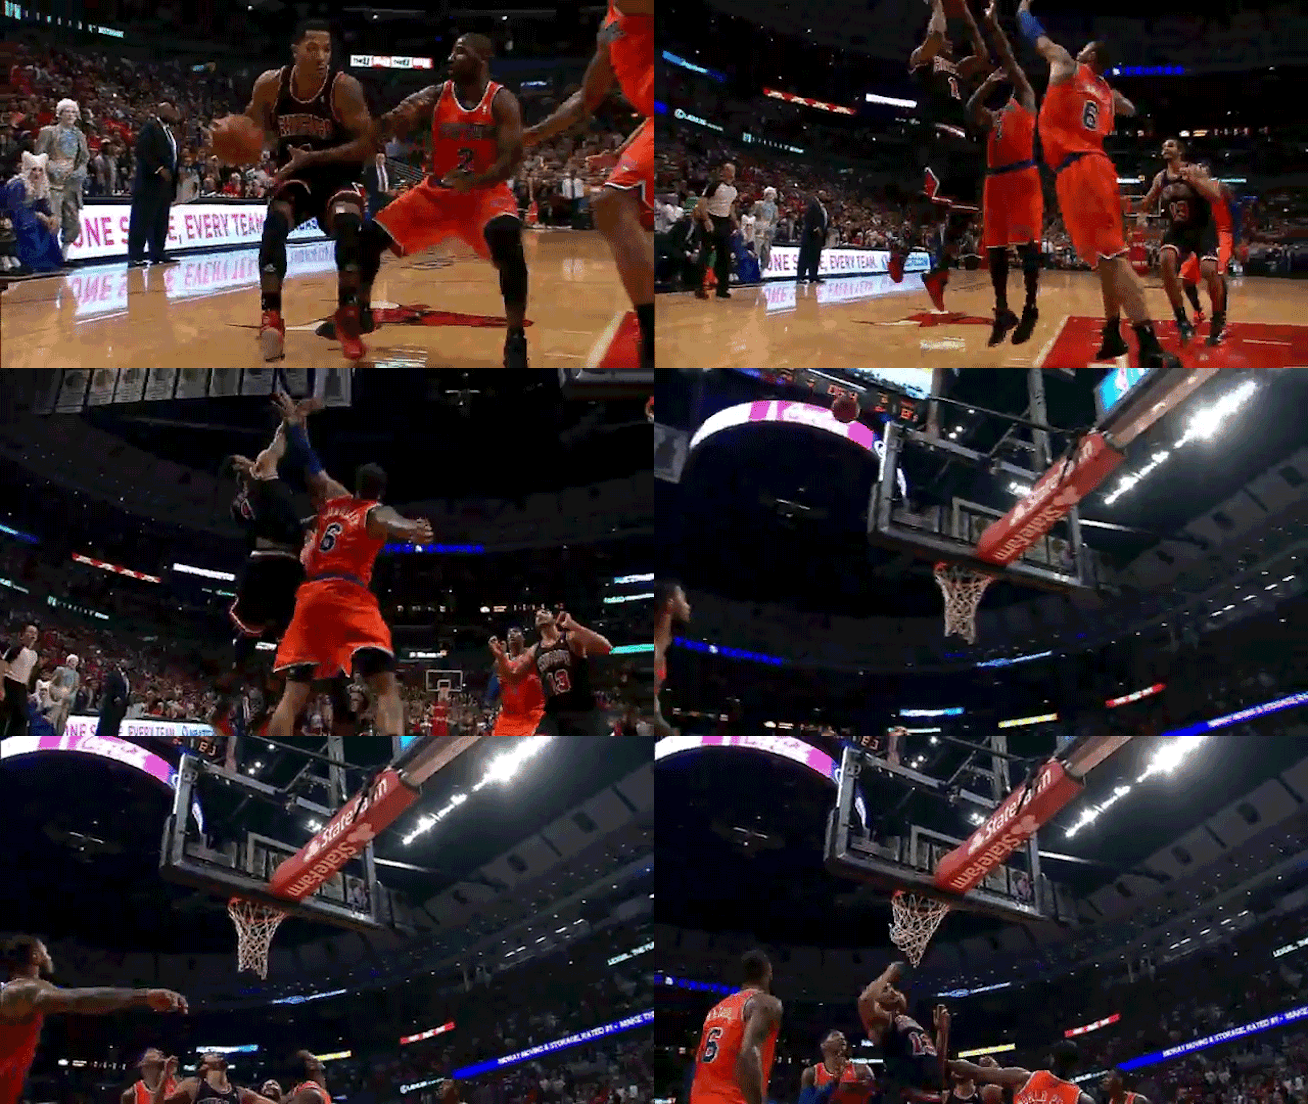
Look at how high Rose releases his floater on the above shot. Had he released the ball lower, it likely would’ve been sent into the third row.
4. Start By Developing a Super Soft Touch
All shots within 10-12 feet from the basket require a soft touch. In this case, the higher your arc on your floater, the softer your touch will be. Evaluating how far the closest defender is will give you a better idea of just how high you want your floater to be.
Start by working on floaters with a really high arc, like you’d need to shoot over a 7-foot big man. Once you get the hang of the high arc floater, work on training different arc heights and different angles (baseline floater, floater off the glass, etc.) to continue to build your confidence.
If you’re just starting out with this shot, I’d also recommend working on floaters without any dribbles. Simply apply different footwork patterns (left step-right step, right step-left step, jump stop) and then elevate into your floater.
After you’ve mastered that, you can start thinking about different situations—such as shooting a straight-up floater, or a floater coming off a curl around a screen. Then you can add one dribble to the equation and go over the same situations. I suggest adding more dribbles only after you feel comfortable with the catch-and-shoot floater and one-dribble floaters. After you’ve mastered those, you can begin to hone in on any unique situations where you might deploy the floater in a game. Master the skill first, then apply it game situations second.
Photo Credit: Jesse D. Garrabrant/Getty Images
READ MORE:
RECOMMENDED FOR YOU
MOST POPULAR
Scoring the Basketball: 4 Keys to Sinking More Floaters
As basketball has evolved, the floater has become a lethal weapon in the paint for players of all sizes and positions.
There are three basic types of floater shots: a floater off one foot, a floater off two feet, and a Eurostep floater. Out of these three, the two-foot floater is the one that allows for maximum control. The reason is simple: landing on both feet gives you extra time to read the defense and allows you to generate more power for your jump. To have a high percentage two-foot floater, it takes much more than just working on the arc of the shot. Let’s break down four keys to helping you make this shot an essential part of your scoring arsenal.[instagram src=”https://www.instagram.com/p/BfYSNKEjF6B/”]
1. Reduce Your Ground Contact Time
In the game, you want to move as efficiently as possible. That’s why paying attention to such details as ground contact can be a game changer. As soon as you plant your feet and stop, you should be able to jump or make an extra step in any direction. The quicker you can make that jump or extra step, the shorter your ground contact time will, and the less time the defense will have to react to your move and stifle your shot.
2. Build Balance With Your Footwork
The more footwork patterns you own, the harder you are to guard. When elevating for a two-foot floater, you can precede that by stepping left-right, right-left, or executing a jump stop. The most important part of footwork is balance. If you can take pressure off your knees and keep your center of gravity in the middle of your body when stopping in and around the paint, you’ll have greater balance and be able to execute moves quicker and more efficiently.
In the above play, you can clearly see that as soon as Derrick Rose planted his feet, he was ready to push off efficiently with minimal ground contact.
3. Work on a High Ball Release
If you release your floater too low, the odds of your shot being blocked are greatly increased. Aiming to release the ball around your forehead is a perfect goal. Floaters are mostly used when you have blown by your defender and you see help-side big man coming to contest your shot. Keeping that in mind, you also want to release the ball while you’re on your way up into your jump. If you hold the ball too long, you’re giving defenders more time to block or alter your shot.
Look at how high Rose releases his floater on the above shot. Had he released the ball lower, it likely would’ve been sent into the third row.
4. Start By Developing a Super Soft Touch
All shots within 10-12 feet from the basket require a soft touch. In this case, the higher your arc on your floater, the softer your touch will be. Evaluating how far the closest defender is will give you a better idea of just how high you want your floater to be.
Start by working on floaters with a really high arc, like you’d need to shoot over a 7-foot big man. Once you get the hang of the high arc floater, work on training different arc heights and different angles (baseline floater, floater off the glass, etc.) to continue to build your confidence.
If you’re just starting out with this shot, I’d also recommend working on floaters without any dribbles. Simply apply different footwork patterns (left step-right step, right step-left step, jump stop) and then elevate into your floater.
After you’ve mastered that, you can start thinking about different situations—such as shooting a straight-up floater, or a floater coming off a curl around a screen. Then you can add one dribble to the equation and go over the same situations. I suggest adding more dribbles only after you feel comfortable with the catch-and-shoot floater and one-dribble floaters. After you’ve mastered those, you can begin to hone in on any unique situations where you might deploy the floater in a game. Master the skill first, then apply it game situations second.
Photo Credit: Jesse D. Garrabrant/Getty Images
READ MORE:

