Front Squat 101: How to Master The Move in 5 Minutes
The Front Squat is a lower-body exercise that will strengthen your legs and hips, particularly your quads (thigh muscles) and glutes (butt muscles).
Front Squats are similar to Back Squats, however the barbell is placed across the front side of your shoulders instead of your upper back. This shifts the center of mass forward, which allows for a more upright posture, making it a spine-friendly lift. It also shifts some of the work from your glutes to your quads, making this one of the most effective quad strength and size builders.
This guide will teach you how to perform—and then perfect—your Front Squat technique. You’ll find photos and videos that illustrate the finer points of the move.
How to Perform the Front Squat: A Quick Overview
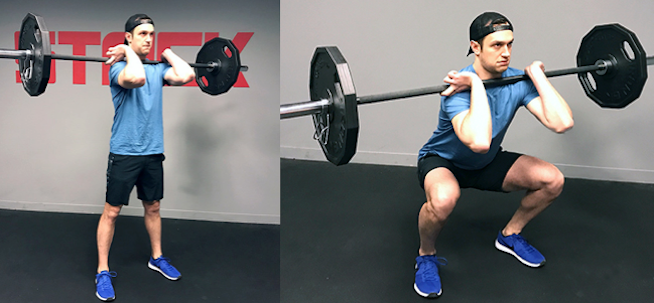
Begin with the barbell across the front side of your shoulders. Place your fingertips under the barbell just outside of your shoulders and drive your elbows up. Keeping your chest up and core tight, bend at your hips and knees to lower into a squat until your thighs are parallel to the ground. Straighten your hips and knees to drive up to the starting position.
That’s the gist of it. However, if you need more coaching, we go deeper on technique and common mistakes below.
Front Squat Barbell Placement
The barbell should sit across the front side of your shoulders close to your neck. A good way to tell if the bar is positioned correctly is to do a straight-arm test. Place the barbell across your shoulders and straighten your arms forward so they’re parallel to the ground. The barbell is in the proper position if it stays in place.
From this point, you can then decide which grip to use. You must remember that your hands are there to add extra stability and control, not to hold the weight, which is your torso’s job.
Here are the three Front Squat grip options:
Clean Grip
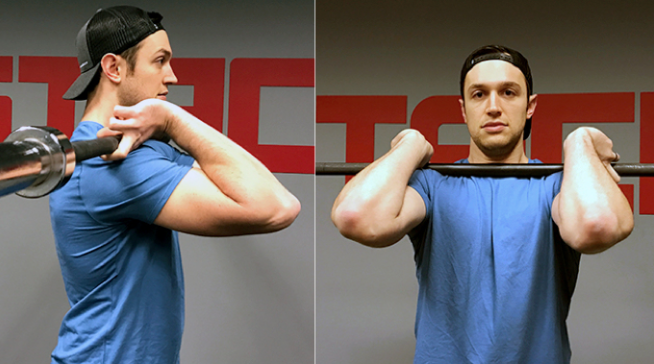
This is the classic grip used in the Front Squat and is the same position used when catching the bar during a Clean. With the barbell in position, place your fingertips under the bar just outside of your shoulders. Many people prefer to have all of their fingertips under the bar, but that’s not a requirement if it’s not comfortable—I prefer two fingers under the bar.
Now drive your elbows up so your upper arms are parallel to the ground. Your arms should also be parallel to each other. This is the grip you will hold throughout the lift.
The clean grip can cause wrist pain if you don’t have sufficient mobility and it is generally recommended that athletes who rely on their wrists (i.e., pitchers and tennis player) to avoid it. Also, it can be tough to get into this position if you have poor shoulder mobility or large biceps.
Cross Grip
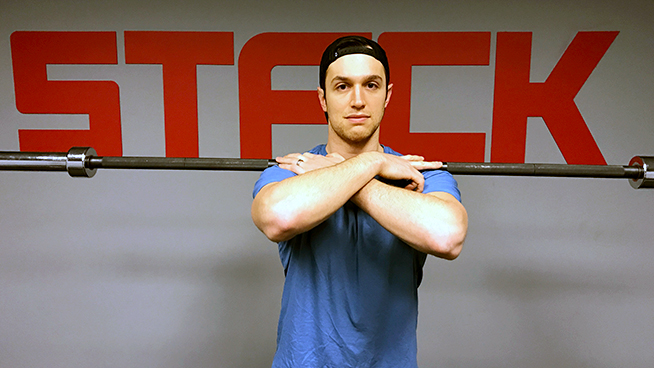
The cross grip is another popular grip used for the Front Squat. Simply cross your arms in front of you and place your hands on the top of the barbell at your opposite shoulders. Now drive your elbows up so your arms are approximately parallel to the ground. This grip is easier on your wrists and has virtually no mobility limitations, but it might not feel as stable as the clean grip.
Clean Grip With Straps
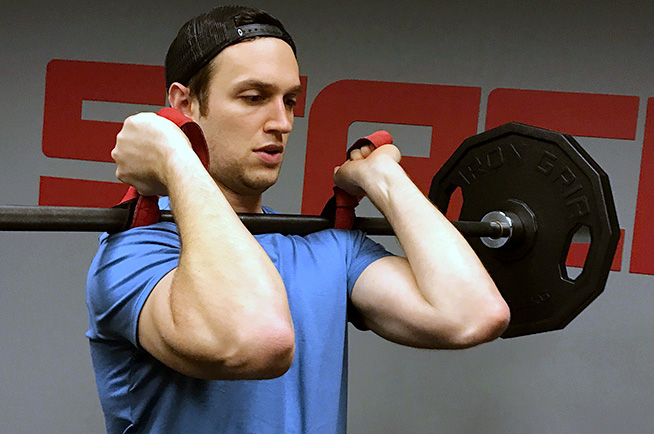
This is a variation I learned from Dr. John Rusin, strength coach and physical therapist. Wrap a pair of lifting straps around the barbell and position them about shoulder-width apart. Grab hold of each strap as close to the barbell as you can and position your arms exactly like you would with the clean grip. This variation is easier on the wrists, requires less mobility and offers tremendous support. It’s my personal favorite.
Ideally, you should have a squat rack to do Front Squats. Begin with the bar on pins about chest height so you can get under the bar, position it across your shoulders and grip it before lifting it off the rack. If you don’t have access to a rack, you can deadlift the bar off of the floor and do a Hang Clean to get it up to your shoulders as shown below. However, this will limit the amount of weight you can use.
Front Squat Foot Position
Once you step back from the rack, it’s time to set your feet and prepare for your first rep. Start with your feet between hip- and shoulder-width apart with your toes pointed slightly outwards at about 10-15 degrees. Try this position and you can then adjust to a narrower or stance wider depending on what feels good. There’s not a single correct stance. Experiment (with lightweight) and find what works for you.
Front Squat Technique Step-by-Step
Step 1: Take a deep breath in, tighten your core and pull your shoulder blades down and back.
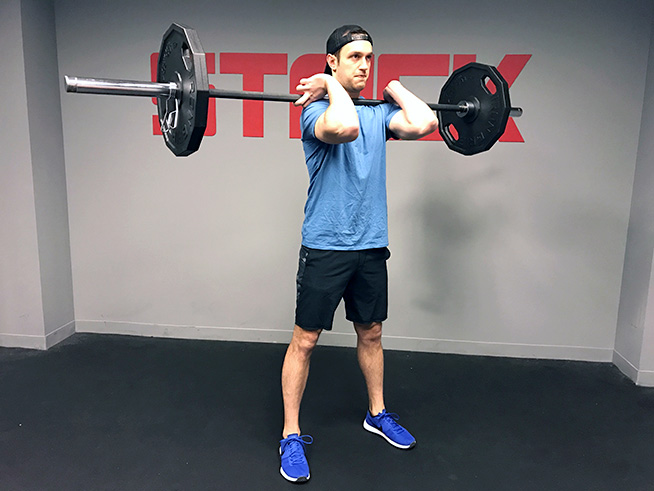
Step 2: Sit your hips back, bend your knees and push your knees out to lower into the Squat. Keep your chest and elbows up throughout the rep.
Step 3: Continue bending your hips and knees under your thighs are approximately parallel the ground.
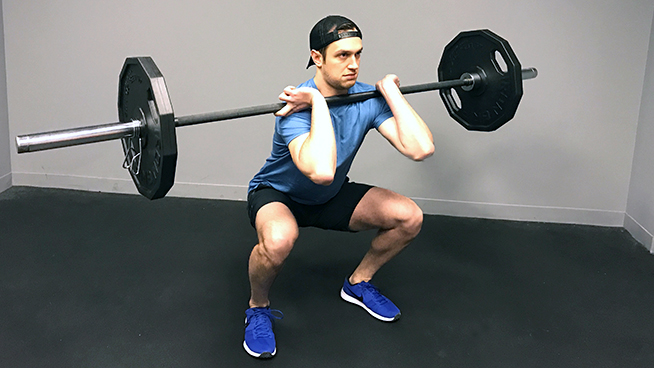
Step 4: Drive through your midfoot to stand up out of the squat as if you are pushing the ground away from you. You should feel your quads and glutes doing most of the work. Squeeze your glutes to extend your hips at the top of the Squat.
It’s a fairly simple exercise to perform, however there are a few common mistakes that you need to avoid:
Mistake 1: You hold the barbell with your arms. If your forearms are vertical and your arms are supporting the barbell, you’re doing it wrong. Refer back to the grip instructions and photos above.
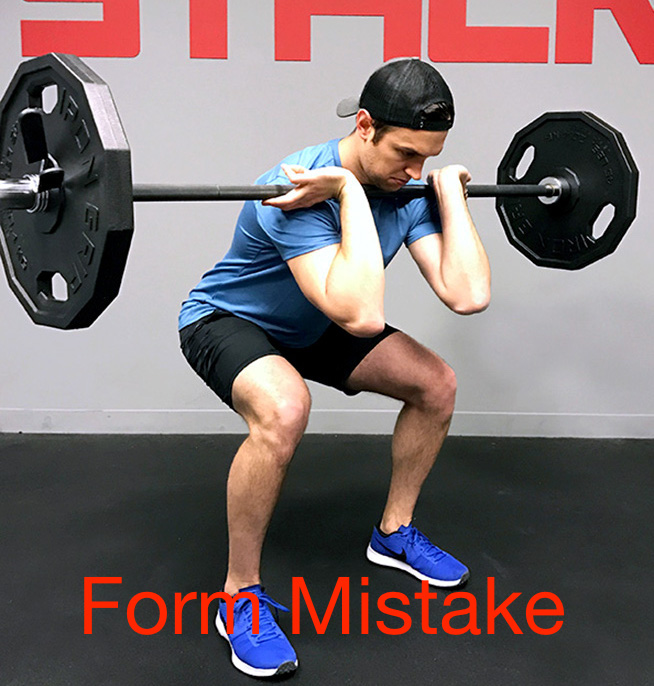
Mistake 2: Your elbows drop. Keep your elbows up throughout the Squat. The barbell will slide forward off your shoulders if they tilt down too far.
Mistake 3: Your knees collapse inwards. This is extremely dangerous for your knees. To prevent it from happening, make a concerted effort to drive your knees outward as you lower into the squat. This will help to keep them aligned over your ankles and in a safe position that can handle heavy weight.
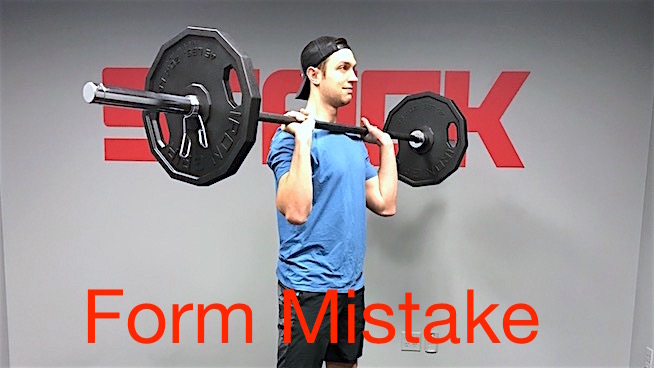
Mistake 4: You release your core. Tighten your core as if you’re about to get punched in the stomach. Hold this throughout the exercise and reset at the top of the lift if needed. Otherwise, you might tilt forward and drop the bar.
How to Front Squat With Dumbbells
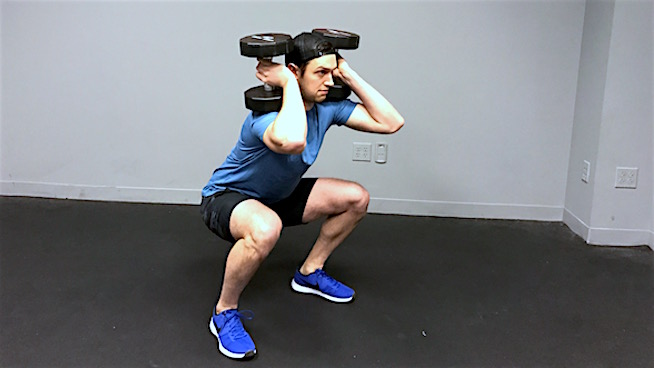
If you don’t have access to a barbell, you can also do Front Squats with dumbbells. Some people like to hold the dumbbells horizontally with one end of the dumbbell on their shoulders. We find this makes your arms work too hard. It’s easier to hold the dumbbells vertically on your shoulders as shown above. Use the same technique as the Barbell Front Squat.
How to Front Squat With Kettlebells
The Double Kettlebell Front Squat is a favorite among strength coaches. It’s beginner-friendly, builds lower-body strength and will improve Front Squat form. Boston-based strength coach Tony Gentilcore goes into detail on why he loves this lift here. Again, use the same technique as the Barbell Front Squat.
The Benefits of the Front Squat
The Front Squat is a compound exercise, meaning that multiple joints and muscle groups are involved. Although it’s primarily a lower-body exercise, it’s really a full-body lift. Everything from your feet to your arms has to work together to perform this lift correctly.
Here are some of the benefits of the Front Squat:
It Builds Strong Quads
The Front Squat is considered one of the most effective exercises for building quad strength and size. Rather than wasting time on Leg Extensions, do Front Squats. You will build your quads and receive so many other benefits that aren’t possible being locked into a machine.
It’s Easier on Your Back
The upright torso position in the Front Squat puts less stress on your lumbar spine (lower back) compared to Back Squats, which require a forward torso lean. That said, a Back Squat performed with correct form shouldn’t cause any problems.
It Builds a Stronger Core
The Front Squat can be considered a weighted core exercise. The position of the bar and upright torso works the front of your core (abs and obliques), and helps build the core strength you need to handle heavy weight in other lifts, such as the Back Squat or Deadlift.
It’s Easier on Your Knees
Research shows that Front Squats are easier on the knees than Back Squats, which makes it a great option if you have prior knee injuries or nagging knee pain. However, this might be because you can’t lift as much weight as with Back Squats.
It Improves Mobility
Front Squats improve mobility in your hips, upper back and shoulders. If you’re feeling tight or your technique is off in other lower-body exercises, adding Front Squats into your routine might correct the problem(s).
These benefits add up to make the Front Squat one of the best lifts for athletes, and is a worthy addition to a lower-body training program.
Front Squat Muscles Worked
Everything from your feet to your arms plays a critical role in the Front Squat. However, the quads and glutes are considered the primary movers, or primary muscles that you’re training on this exercise.

RELATED LINKS:
RECOMMENDED FOR YOU
Front Squat 101: How to Master The Move in 5 Minutes
The Front Squat is a lower-body exercise that will strengthen your legs and hips, particularly your quads (thigh muscles) and glutes (butt muscles).
Front Squats are similar to Back Squats, however the barbell is placed across the front side of your shoulders instead of your upper back. This shifts the center of mass forward, which allows for a more upright posture, making it a spine-friendly lift. It also shifts some of the work from your glutes to your quads, making this one of the most effective quad strength and size builders.
This guide will teach you how to perform—and then perfect—your Front Squat technique. You’ll find photos and videos that illustrate the finer points of the move.
How to Perform the Front Squat: A Quick Overview

Begin with the barbell across the front side of your shoulders. Place your fingertips under the barbell just outside of your shoulders and drive your elbows up. Keeping your chest up and core tight, bend at your hips and knees to lower into a squat until your thighs are parallel to the ground. Straighten your hips and knees to drive up to the starting position.
That’s the gist of it. However, if you need more coaching, we go deeper on technique and common mistakes below.
Front Squat Barbell Placement
The barbell should sit across the front side of your shoulders close to your neck. A good way to tell if the bar is positioned correctly is to do a straight-arm test. Place the barbell across your shoulders and straighten your arms forward so they’re parallel to the ground. The barbell is in the proper position if it stays in place.
From this point, you can then decide which grip to use. You must remember that your hands are there to add extra stability and control, not to hold the weight, which is your torso’s job.
Here are the three Front Squat grip options:
Clean Grip

This is the classic grip used in the Front Squat and is the same position used when catching the bar during a Clean. With the barbell in position, place your fingertips under the bar just outside of your shoulders. Many people prefer to have all of their fingertips under the bar, but that’s not a requirement if it’s not comfortable—I prefer two fingers under the bar.
Now drive your elbows up so your upper arms are parallel to the ground. Your arms should also be parallel to each other. This is the grip you will hold throughout the lift.
The clean grip can cause wrist pain if you don’t have sufficient mobility and it is generally recommended that athletes who rely on their wrists (i.e., pitchers and tennis player) to avoid it. Also, it can be tough to get into this position if you have poor shoulder mobility or large biceps.
Cross Grip

The cross grip is another popular grip used for the Front Squat. Simply cross your arms in front of you and place your hands on the top of the barbell at your opposite shoulders. Now drive your elbows up so your arms are approximately parallel to the ground. This grip is easier on your wrists and has virtually no mobility limitations, but it might not feel as stable as the clean grip.
Clean Grip With Straps

This is a variation I learned from Dr. John Rusin, strength coach and physical therapist. Wrap a pair of lifting straps around the barbell and position them about shoulder-width apart. Grab hold of each strap as close to the barbell as you can and position your arms exactly like you would with the clean grip. This variation is easier on the wrists, requires less mobility and offers tremendous support. It’s my personal favorite.
Ideally, you should have a squat rack to do Front Squats. Begin with the bar on pins about chest height so you can get under the bar, position it across your shoulders and grip it before lifting it off the rack. If you don’t have access to a rack, you can deadlift the bar off of the floor and do a Hang Clean to get it up to your shoulders as shown below. However, this will limit the amount of weight you can use.
Front Squat Foot Position
Once you step back from the rack, it’s time to set your feet and prepare for your first rep. Start with your feet between hip- and shoulder-width apart with your toes pointed slightly outwards at about 10-15 degrees. Try this position and you can then adjust to a narrower or stance wider depending on what feels good. There’s not a single correct stance. Experiment (with lightweight) and find what works for you.
Front Squat Technique Step-by-Step
Step 1: Take a deep breath in, tighten your core and pull your shoulder blades down and back.

Step 2: Sit your hips back, bend your knees and push your knees out to lower into the Squat. Keep your chest and elbows up throughout the rep.
Step 3: Continue bending your hips and knees under your thighs are approximately parallel the ground.

Step 4: Drive through your midfoot to stand up out of the squat as if you are pushing the ground away from you. You should feel your quads and glutes doing most of the work. Squeeze your glutes to extend your hips at the top of the Squat.
It’s a fairly simple exercise to perform, however there are a few common mistakes that you need to avoid:
Mistake 1: You hold the barbell with your arms. If your forearms are vertical and your arms are supporting the barbell, you’re doing it wrong. Refer back to the grip instructions and photos above.
Mistake 2: Your elbows drop. Keep your elbows up throughout the Squat. The barbell will slide forward off your shoulders if they tilt down too far.
Mistake 3: Your knees collapse inwards. This is extremely dangerous for your knees. To prevent it from happening, make a concerted effort to drive your knees outward as you lower into the squat. This will help to keep them aligned over your ankles and in a safe position that can handle heavy weight.

Mistake 4: You release your core. Tighten your core as if you’re about to get punched in the stomach. Hold this throughout the exercise and reset at the top of the lift if needed. Otherwise, you might tilt forward and drop the bar.
How to Front Squat With Dumbbells

If you don’t have access to a barbell, you can also do Front Squats with dumbbells. Some people like to hold the dumbbells horizontally with one end of the dumbbell on their shoulders. We find this makes your arms work too hard. It’s easier to hold the dumbbells vertically on your shoulders as shown above. Use the same technique as the Barbell Front Squat.
How to Front Squat With Kettlebells

The Double Kettlebell Front Squat is a favorite among strength coaches. It’s beginner-friendly, builds lower-body strength and will improve Front Squat form. Boston-based strength coach Tony Gentilcore goes into detail on why he loves this lift here. Again, use the same technique as the Barbell Front Squat.
The Benefits of the Front Squat
The Front Squat is a compound exercise, meaning that multiple joints and muscle groups are involved. Although it’s primarily a lower-body exercise, it’s really a full-body lift. Everything from your feet to your arms has to work together to perform this lift correctly.
Here are some of the benefits of the Front Squat:
It Builds Strong Quads
The Front Squat is considered one of the most effective exercises for building quad strength and size. Rather than wasting time on Leg Extensions, do Front Squats. You will build your quads and receive so many other benefits that aren’t possible being locked into a machine.
It’s Easier on Your Back
The upright torso position in the Front Squat puts less stress on your lumbar spine (lower back) compared to Back Squats, which require a forward torso lean. That said, a Back Squat performed with correct form shouldn’t cause any problems.
It Builds a Stronger Core
The Front Squat can be considered a weighted core exercise. The position of the bar and upright torso works the front of your core (abs and obliques), and helps build the core strength you need to handle heavy weight in other lifts, such as the Back Squat or Deadlift.
It’s Easier on Your Knees
Research shows that Front Squats are easier on the knees than Back Squats, which makes it a great option if you have prior knee injuries or nagging knee pain. However, this might be because you can’t lift as much weight as with Back Squats.
It Improves Mobility
Front Squats improve mobility in your hips, upper back and shoulders. If you’re feeling tight or your technique is off in other lower-body exercises, adding Front Squats into your routine might correct the problem(s).
These benefits add up to make the Front Squat one of the best lifts for athletes, and is a worthy addition to a lower-body training program.
Front Squat Muscles Worked
Everything from your feet to your arms plays a critical role in the Front Squat. However, the quads and glutes are considered the primary movers, or primary muscles that you’re training on this exercise.

RELATED LINKS:

