Golfers, Beat Low-Back Pain With This Program
Eighteen months ago I received a phone call from a local golf phenom, Derek Bard. He had just come off a stellar year, placing 2nd at the U.S. Amateur, earning himself a shot to play with the big boys at the Masters and U.S. Open. The problem was that he was suffering from this horrible low-back pain and wasn’t able to finish tournaments because of it.
He had one more year left to play at Virginia before he would take the leap and become a pro. Obviously, he would need his back to handle the demands of pro golf, so he asked if I could help. Despite not knowing a thing about golf, I told him I could definitely help his back issues.
The first day Derek came in to see me I gave him a stick and told him to show me his swing (He still didn’t know at this point that I’d only golfed once in my life and broke the driver on my first drive). After watching him swing a stick a few times I had a pretty good idea of what was going on. I don’t know much about golf but I have a pretty good level of knowledge on movement, and a golf swing is just a movement pattern when you break it all down.
Right?
Well, that’s the way I look at things at least. Movements and movement patterns.
You would think that because of the pain in his lower back, his back would be where the problem was, right?
Wrong.
Very seldom is the problem actually in the same location where the pain is. You can usually find it if you look up or down the chain. So in this scenario the two places I was focused on were the upper back (Thoracic Spine) and the hips.
Immediately I could see that Derek was not moving through a full range of motion in his thoracic spine during his backswing, and his hips were getting locked up on his follow through. This was creating an unwanted/excessive rotation and pull in the lower back. Take this movement with these restrictions and repeat it hundreds of times over the course of a tournament and you have the perfect recipe for excruciating back pain.
Side Note: Derek’s secondary sport in high school was hockey. This meant he suffered from an anterior tilt in his pelvis, which was also throwing off his alignment during his swing. Not to mention the complete disengagement of the core.
Now that you have the rundown of what was going on movement-wise, I can give you the details on the program we used to get him back to full strength and off to Q-School. I would recommend this same approach to any golfer or rotational athlete who suffers from low-back pain.
The goal of the program is to attack 3 things:
- Pelvic Alignment/Hip Mobility
- Core Strength
- Thoracic Spine Mobility
Pelvic Alignment
I believe the hips are the foundation of just about all lower-body movements, especially when it comes to rotational movements. For the hips to move properly you first need to make sure they are in proper alignment.
As Derek had also played hockey for the majority of this life, he had a pretty bad case of Anterior Pelvic Tit. This basically means that instead of his pelvis sitting in an upright/neutral position it will sit with a slight tilt anteriorly
The cause?
In hockey, or sports in general, much of an athlete’s time is spent in an “athletic” and slightly “flexed” position, which leads to excessive tightening of the hip flexor muscles. This results in an anterior pull on the pelvis as well as decreased engagement of the core musculature.
To attack the alignment issues you first need to be aware that your hips are out of alignment.
To do that I took him through our “Dead Bug” protocol:
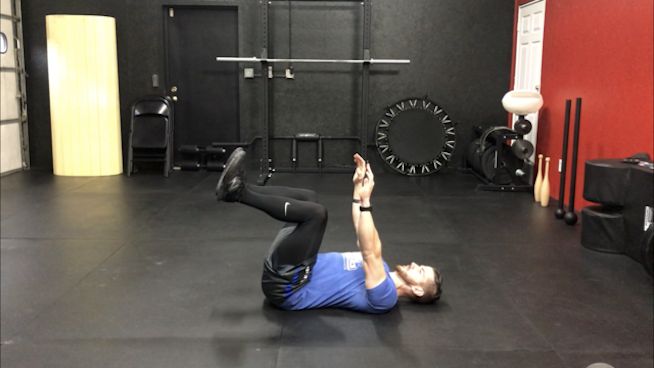
The Dead Bug is a position on the floor where you’re lying on your back with your hips and knees bent to 90 degrees while your arms are pointing to the sky. The key here is to make sure there is absolutely no space between your lower back and the floor. For someone with bad anterior pelvic tilt it will be somewhat difficult to hold this position. They will also quickly realize what it feels like to be in a “neutral” position.
After you can reach this position you can start to add movement as shown in the video below:
Once you are aware of your pelvic alignment you can begin to reinforce the neural position with these static exercises.
- A1 – Core Breathing Drills
- A2 – Full Body Tension Planks
- A3 – Hip Flexor Stretch With Breathing
Now that we’ve got the core under control it’s time to look at the actual hips and the muscles that stabilize them. I like to use a simple Mini Band protocol at the beginning of a session to make sure the glutes, core and hip stabilizers are activated and ready to fire.
Mini Band Activation Work
- Lateral Walks
- Clam Shells
- Squats
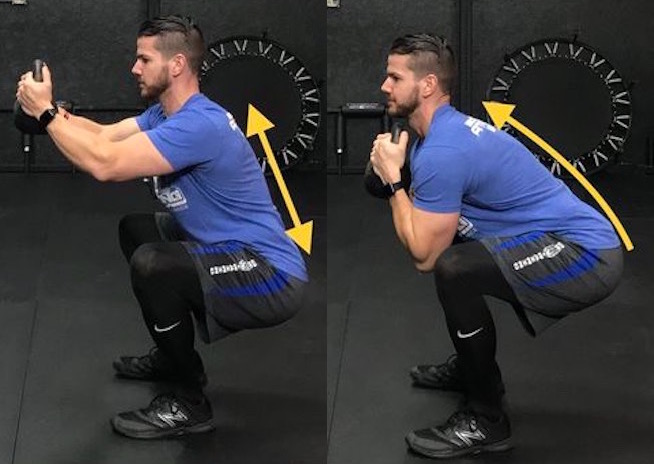
With all of the pre-habilitation taken care of it’s time to move into some lower-body strength exercises while still focusing on pelvic alignment and core activation. My favorite is the Extended Arm Goblet Squat.
The Extended Arm Goblet Squat is great exercise to use in this situation because as you can see in the picture it forces the athlete to completely engage their core which will in turn hold their pelvis in a more neutral position and allow for their chest to stay more vertical. If the athlete is “rounded” over you know their core is not engaged.
Core Strength
The second piece of this puzzle is to strengthen the core so that it can hold the hips in alignment while also generating torque during the swing motion. The Dead Bug exercise shown above was our first step in attacking the core. Before you can strengthen the core you have to be able to create control with it.
Since golf requires dynamic strength in the core, we want to train the same way. The goal is to be able to “turn on” the core and keep it turned on throughout a movement’s full range of motion.
One of my favorite exercises to teach rotational athletes how to maintain a rigid core throughout a movement is this little gem I picked up from the @Perform Better Instagram a few year back (Shown is a football player using it to work on thoracic mobility, but the same principles apply)
The goal of this movement is to have the athlete put all pressure in the core and to “find” movement in the T-Spine versus the lower back. You will notice how they have to also incorporate solid hip rotation to get the full range of motion here. This exercise is really one that hits all three of the of the keys to eliminating back pain—hip alignment, core strength and thoracic mobility.
We also incorporated:
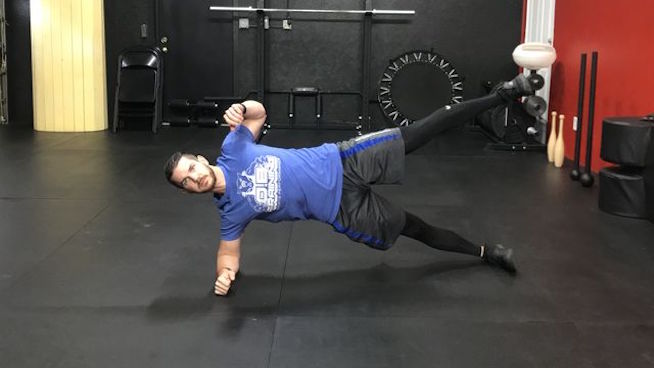
Side Plank With Leg Lift to focus on abductor recruitment
Wide Stance Band Rotations
Thoracic Spine Mobility
The final key here is to “open up” the thoracic spine so it can move more freely. Unfortunately, most humans have extremely poor posture, and the T-Spine is the area that suffers most. The upper back becomes extremely tight, weak and overly rounded, which makes it near impossible to rotate properly, especially when swinging a golf club.
If an athlete is unable to find movement in their thoracic spine, they will surely find it somewhere else up or down the chain. For rotational athletes, this movement is often found in their lower back.
A secondary benefit of increased thoracic spine mobility is an increase in power. Yup, that’s right. Increase your mobility and increase your range of motion. Increase your range of motion and increase the distance the club travels resulting in an increase in torque, speed and power.
Again, our goal is to increase thoracic mobility in a dynamic way working to improve range of motion with every rep.
Here is the mobility protocol that Derek used to open up his upper back:
Lax Ball / Foam Roller Soft Tissue Release
The focus here is to use the lacrosse ball and foam roller to break up any tissue adhesions and release the areas around the scapulas and middle and lower traps. We also used a lacrosse ball peanut to work on increasing range of motion at each vertebral checkpoint through the t-spine area.
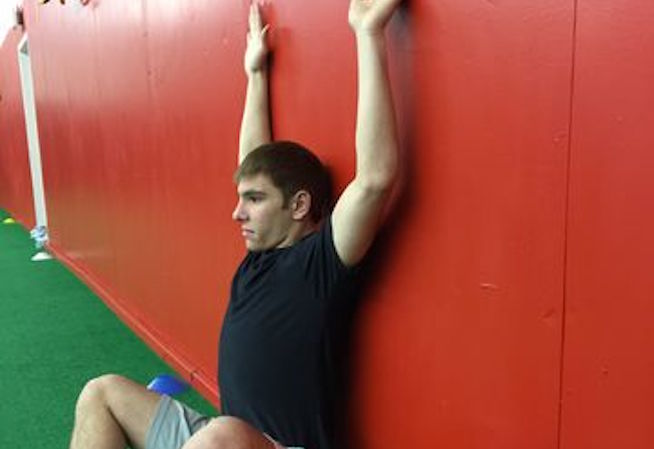
Wall Slide / Seated Wall Flexion
After soft tissue release these exercises were used to dynamically warm up and open up the upper back and shoulder area. For both of these exercises it is imperative to keep the whole back and shoulder blades against the wall as the arms move up and down.
T-Spine Rotation
This exercise, coupled with some deep breathing, is amazing at increasing range of motion in the transverse plane. The focus here is to get the athlete to rotate through the thoracic spine while keeping the hips and lower back locked into a neutral position.
Scap Push-Ups
Again the goal is to simply loosen up the upper back, specifically the scapula region. These were thrown in to reinforce the feelings of scapular retraction/protraction.
Putting It All Together
Now that we have identified the three key areas that need to be focused on to reduce and eventually eliminate any instance of back pain, it’s time to put it all together into a full training session.
Pre-Warm Up: Soft-Tissue Release
- A1 – Core Breathing Drills
- A2 – Full-Body Tension Planks
- A3 – Hip Flexor Stretch With Breathing (The objective here is to feel the alignment of the hips in each movement and work to keep them “neutral.”)
- B1 – Goblet Squat (Arms extended) 4 x 12
- B2 – Dead Bug 3 x 10 ea.
- B3 – Mini Band Lateral Walks 3 x 10 ea.
- C1 – 1/2 Kneeling Single-Arm press 3 x 10
- C2 – T-Spine Rotation 3 x 3 ea.
- C3 – Scap Push-Ups 3 x 10
- C4 – Banded Rotation 3 x 10 ea.
- D – Farmer’s Walk 3 x 50 Yards. (Focus on posture and squeezing core)
Photo Credit: Michael Svoboda/iStock
READ MORE:
RECOMMENDED FOR YOU
MOST POPULAR
Golfers, Beat Low-Back Pain With This Program
Eighteen months ago I received a phone call from a local golf phenom, Derek Bard. He had just come off a stellar year, placing 2nd at the U.S. Amateur, earning himself a shot to play with the big boys at the Masters and U.S. Open. The problem was that he was suffering from this horrible low-back pain and wasn’t able to finish tournaments because of it.
He had one more year left to play at Virginia before he would take the leap and become a pro. Obviously, he would need his back to handle the demands of pro golf, so he asked if I could help. Despite not knowing a thing about golf, I told him I could definitely help his back issues.
The first day Derek came in to see me I gave him a stick and told him to show me his swing (He still didn’t know at this point that I’d only golfed once in my life and broke the driver on my first drive). After watching him swing a stick a few times I had a pretty good idea of what was going on. I don’t know much about golf but I have a pretty good level of knowledge on movement, and a golf swing is just a movement pattern when you break it all down.
Right?
Well, that’s the way I look at things at least. Movements and movement patterns.
You would think that because of the pain in his lower back, his back would be where the problem was, right?
Wrong.
Very seldom is the problem actually in the same location where the pain is. You can usually find it if you look up or down the chain. So in this scenario the two places I was focused on were the upper back (Thoracic Spine) and the hips.
Immediately I could see that Derek was not moving through a full range of motion in his thoracic spine during his backswing, and his hips were getting locked up on his follow through. This was creating an unwanted/excessive rotation and pull in the lower back. Take this movement with these restrictions and repeat it hundreds of times over the course of a tournament and you have the perfect recipe for excruciating back pain.
Side Note: Derek’s secondary sport in high school was hockey. This meant he suffered from an anterior tilt in his pelvis, which was also throwing off his alignment during his swing. Not to mention the complete disengagement of the core.
Now that you have the rundown of what was going on movement-wise, I can give you the details on the program we used to get him back to full strength and off to Q-School. I would recommend this same approach to any golfer or rotational athlete who suffers from low-back pain.
The goal of the program is to attack 3 things:
- Pelvic Alignment/Hip Mobility
- Core Strength
- Thoracic Spine Mobility
Pelvic Alignment
I believe the hips are the foundation of just about all lower-body movements, especially when it comes to rotational movements. For the hips to move properly you first need to make sure they are in proper alignment.
As Derek had also played hockey for the majority of this life, he had a pretty bad case of Anterior Pelvic Tit. This basically means that instead of his pelvis sitting in an upright/neutral position it will sit with a slight tilt anteriorly
The cause?
In hockey, or sports in general, much of an athlete’s time is spent in an “athletic” and slightly “flexed” position, which leads to excessive tightening of the hip flexor muscles. This results in an anterior pull on the pelvis as well as decreased engagement of the core musculature.
To attack the alignment issues you first need to be aware that your hips are out of alignment.
To do that I took him through our “Dead Bug” protocol:
The Dead Bug is a position on the floor where you’re lying on your back with your hips and knees bent to 90 degrees while your arms are pointing to the sky. The key here is to make sure there is absolutely no space between your lower back and the floor. For someone with bad anterior pelvic tilt it will be somewhat difficult to hold this position. They will also quickly realize what it feels like to be in a “neutral” position.
After you can reach this position you can start to add movement as shown in the video below:
Once you are aware of your pelvic alignment you can begin to reinforce the neural position with these static exercises.
- A1 – Core Breathing Drills
- A2 – Full Body Tension Planks
- A3 – Hip Flexor Stretch With Breathing
Now that we’ve got the core under control it’s time to look at the actual hips and the muscles that stabilize them. I like to use a simple Mini Band protocol at the beginning of a session to make sure the glutes, core and hip stabilizers are activated and ready to fire.
Mini Band Activation Work
- Lateral Walks
- Clam Shells
- Squats
With all of the pre-habilitation taken care of it’s time to move into some lower-body strength exercises while still focusing on pelvic alignment and core activation. My favorite is the Extended Arm Goblet Squat.
The Extended Arm Goblet Squat is great exercise to use in this situation because as you can see in the picture it forces the athlete to completely engage their core which will in turn hold their pelvis in a more neutral position and allow for their chest to stay more vertical. If the athlete is “rounded” over you know their core is not engaged.
Core Strength
The second piece of this puzzle is to strengthen the core so that it can hold the hips in alignment while also generating torque during the swing motion. The Dead Bug exercise shown above was our first step in attacking the core. Before you can strengthen the core you have to be able to create control with it.
Since golf requires dynamic strength in the core, we want to train the same way. The goal is to be able to “turn on” the core and keep it turned on throughout a movement’s full range of motion.
One of my favorite exercises to teach rotational athletes how to maintain a rigid core throughout a movement is this little gem I picked up from the @Perform Better Instagram a few year back (Shown is a football player using it to work on thoracic mobility, but the same principles apply)
The goal of this movement is to have the athlete put all pressure in the core and to “find” movement in the T-Spine versus the lower back. You will notice how they have to also incorporate solid hip rotation to get the full range of motion here. This exercise is really one that hits all three of the of the keys to eliminating back pain—hip alignment, core strength and thoracic mobility.
We also incorporated:
Side Plank With Leg Lift to focus on abductor recruitment
Wide Stance Band Rotations
Thoracic Spine Mobility
The final key here is to “open up” the thoracic spine so it can move more freely. Unfortunately, most humans have extremely poor posture, and the T-Spine is the area that suffers most. The upper back becomes extremely tight, weak and overly rounded, which makes it near impossible to rotate properly, especially when swinging a golf club.
If an athlete is unable to find movement in their thoracic spine, they will surely find it somewhere else up or down the chain. For rotational athletes, this movement is often found in their lower back.
A secondary benefit of increased thoracic spine mobility is an increase in power. Yup, that’s right. Increase your mobility and increase your range of motion. Increase your range of motion and increase the distance the club travels resulting in an increase in torque, speed and power.
Again, our goal is to increase thoracic mobility in a dynamic way working to improve range of motion with every rep.
Here is the mobility protocol that Derek used to open up his upper back:
Lax Ball / Foam Roller Soft Tissue Release
The focus here is to use the lacrosse ball and foam roller to break up any tissue adhesions and release the areas around the scapulas and middle and lower traps. We also used a lacrosse ball peanut to work on increasing range of motion at each vertebral checkpoint through the t-spine area.
Wall Slide / Seated Wall Flexion
After soft tissue release these exercises were used to dynamically warm up and open up the upper back and shoulder area. For both of these exercises it is imperative to keep the whole back and shoulder blades against the wall as the arms move up and down.
T-Spine Rotation
This exercise, coupled with some deep breathing, is amazing at increasing range of motion in the transverse plane. The focus here is to get the athlete to rotate through the thoracic spine while keeping the hips and lower back locked into a neutral position.
Scap Push-Ups
Again the goal is to simply loosen up the upper back, specifically the scapula region. These were thrown in to reinforce the feelings of scapular retraction/protraction.
Putting It All Together
Now that we have identified the three key areas that need to be focused on to reduce and eventually eliminate any instance of back pain, it’s time to put it all together into a full training session.
Pre-Warm Up: Soft-Tissue Release
- A1 – Core Breathing Drills
- A2 – Full-Body Tension Planks
- A3 – Hip Flexor Stretch With Breathing (The objective here is to feel the alignment of the hips in each movement and work to keep them “neutral.”)
- B1 – Goblet Squat (Arms extended) 4 x 12
- B2 – Dead Bug 3 x 10 ea.
- B3 – Mini Band Lateral Walks 3 x 10 ea.
- C1 – 1/2 Kneeling Single-Arm press 3 x 10
- C2 – T-Spine Rotation 3 x 3 ea.
- C3 – Scap Push-Ups 3 x 10
- C4 – Banded Rotation 3 x 10 ea.
- D – Farmer’s Walk 3 x 50 Yards. (Focus on posture and squeezing core)
Photo Credit: Michael Svoboda/iStock
READ MORE:

