How to Perform Olympic Lifts, Part 1: Hang Clean Technique
In this three-part series on Olympic lifting, we will explain the correct technique for these complicated lifts. In Part 1, we focus on how to perform the Hang Clean.
Explosive movements dominate sports. Jumping to spike a volleyball, dunking on your opponent or driving through a defender to finish a play all depend on an athlete’s ability to be explosive. If you want to be a better athlete, you need to perform Olympic lifts.
Olympic lifts—like the Clean and Snatch—are without a doubt the best lifts for becoming more explosive. A 2004 study at the College of New Jersey found that athletes who trained using Olympic lifts were faster, stronger overall and better performers in tests of agility than athletes who did not train with Olympic lifts.
Olympic lifts look complicated, but learning them isn’t as hard as some people make it out to be. Athletes can learn to Olympic lift safely in a short amount of time. A great place to start is with the Hang Clean, which comprises most of the fundamental techniques of the more advanced lifts.
Hang Clean Technique
1) Start Position
Start your Olympic lifts from the hang position as opposed to the ground. The hang position is similar to the one you’d assume if you were about to perform a vertical jump. It helps you get accustomed to using your hips to drive the bar. Also, the bar doesn’t have to travel as far up, limiting potential technique mistakes.
To assume the hang position, stand in an athletic stance with your feet about hip-width apart. Holding the bar in front, bend at the hips and lower until the bar is just above your knees and close to your legs. Bend your knees slightly. Keep your back flat, chest in front of the bar and chest and head up.
2) Jump With the Bar
From the hang position, you do something very familiar—you jump! Make sure you are flat footed to start, giving you a stable base. Jump as forcefully as possible, extending through your hips, knees and ankles. Finish through your toes and shrug your shoulders at the top. You are trying to jump as high as possible, so you need to put force into the ground.
When you land, bend your knees slightly and don’t let your feet get outside of your shoulders.

3) What About Your Arms?
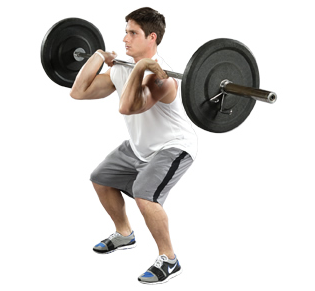
To get the bar in the racked position, you need to use your arms. Instead of pulling as hard as you can, try keeping your arms relaxed (like noodles) and use them to guide the bar. Many athletes make the mistake of flipping the bar out, away from their bodies. Keep the bar close to your body and your elbows above the bar.
When it’s time to rack the weight, you should be able to simply drive your elbows forward and around the bar, sit back on your flat feet and receive it. This step is easy if you have done things right up to this point. The bar should end up resting across your shoulders, not on your chest or on top of your wrists.
Photo: t-nation.com
Wil Fleming is the owner of Force Fitness in Bloomington, Ind. During the past two years, he has helped more than 15 athletes go on to play Division I athletics. He is the author of the speed and agility portion of the soon-to-be released Essentials of High School Strength and Conditioning. Prior to his career as an athletic performance coach, Fleming was an All-American athlete at Indiana University and a competitor in the 2008 Olympic Trials for track and field.
RECOMMENDED FOR YOU
MOST POPULAR
How to Perform Olympic Lifts, Part 1: Hang Clean Technique
In this three-part series on Olympic lifting, we will explain the correct technique for these complicated lifts. In Part 1, we focus on how to perform the Hang Clean.
Explosive movements dominate sports. Jumping to spike a volleyball, dunking on your opponent or driving through a defender to finish a play all depend on an athlete’s ability to be explosive. If you want to be a better athlete, you need to perform Olympic lifts.
Olympic lifts—like the Clean and Snatch—are without a doubt the best lifts for becoming more explosive. A 2004 study at the College of New Jersey found that athletes who trained using Olympic lifts were faster, stronger overall and better performers in tests of agility than athletes who did not train with Olympic lifts.
Olympic lifts look complicated, but learning them isn’t as hard as some people make it out to be. Athletes can learn to Olympic lift safely in a short amount of time. A great place to start is with the Hang Clean, which comprises most of the fundamental techniques of the more advanced lifts.
Hang Clean Technique
1) Start Position
Start your Olympic lifts from the hang position as opposed to the ground. The hang position is similar to the one you’d assume if you were about to perform a vertical jump. It helps you get accustomed to using your hips to drive the bar. Also, the bar doesn’t have to travel as far up, limiting potential technique mistakes.
To assume the hang position, stand in an athletic stance with your feet about hip-width apart. Holding the bar in front, bend at the hips and lower until the bar is just above your knees and close to your legs. Bend your knees slightly. Keep your back flat, chest in front of the bar and chest and head up.
2) Jump With the Bar
From the hang position, you do something very familiar—you jump! Make sure you are flat footed to start, giving you a stable base. Jump as forcefully as possible, extending through your hips, knees and ankles. Finish through your toes and shrug your shoulders at the top. You are trying to jump as high as possible, so you need to put force into the ground.
When you land, bend your knees slightly and don’t let your feet get outside of your shoulders.

3) What About Your Arms?
To get the bar in the racked position, you need to use your arms. Instead of pulling as hard as you can, try keeping your arms relaxed (like noodles) and use them to guide the bar. Many athletes make the mistake of flipping the bar out, away from their bodies. Keep the bar close to your body and your elbows above the bar.
When it’s time to rack the weight, you should be able to simply drive your elbows forward and around the bar, sit back on your flat feet and receive it. This step is easy if you have done things right up to this point. The bar should end up resting across your shoulders, not on your chest or on top of your wrists.
Photo: t-nation.com
Wil Fleming is the owner of Force Fitness in Bloomington, Ind. During the past two years, he has helped more than 15 athletes go on to play Division I athletics. He is the author of the speed and agility portion of the soon-to-be released Essentials of High School Strength and Conditioning. Prior to his career as an athletic performance coach, Fleming was an All-American athlete at Indiana University and a competitor in the 2008 Olympic Trials for track and field.


