The Steel Mace: Why Every Athlete Should Know This Unique Piece of Equipment
My earliest memories of athletic training revolve around conventional equipment. You know, the barbells, dumbbells and weight plates that make up most of today’s weight rooms. I embraced this and became a modestly good powerlifter over time.
It wasn’t until I retired from powerlifting and football that I began to seek other methods of upping my strength and fitness. I was bored of the typical training, and I wanted to save my athletes from having to train the same way all the time. That boredom was a big issue for me as an athlete and may have been the reason I disliked training so much. It just became the same thing day in and day out!
As I searched for “new” tools to train with, I came across what is called a Macebell. This tool, also known as a steel mace, was intimidating, novel and frankly pretty badass. It unlocked a passion in me that I had not had since I stepped away from the gridiron and the platform.
This article is intended to give you a crash course in this unique implement and leave you feeling confident enough to go swing one for yourself!
What is the steel mace?

Before we get into the fun stuff you can do with the steel mace, we should first talk a little bit about what exactly it is. This is a piece of equipment that mimics an implement that’s been used as a training tool in India for centuries. The Pehlwani wrestlers in India train with a device called a Gada. It consists of a bamboo stalk with a concrete ball on the end of it.
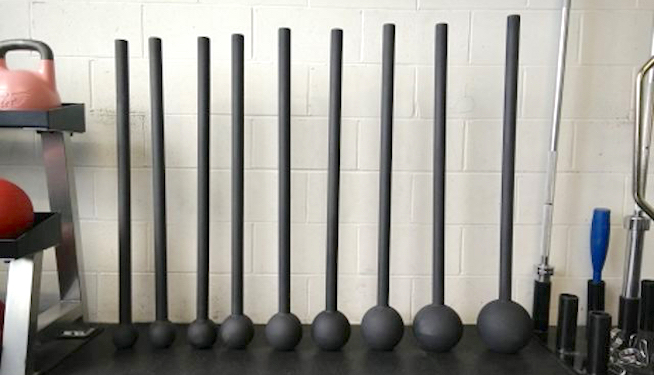
Today’s macebells consist of a steel ball welded to an all-steel shaft. They range from as light as 5 pounds all the way up to a massive 55-pound steel mace. The heavier the mace, the longer the shaft.
The tool itself is more readily available than ever because many mainstream companies (such as Onnit) have released their own versions into the market. As far as I’m concerned, this is an excellent thing. The only problem with the widespread availability of the steel mace is that we don’t have enough people to teach athletes how to properly implant the tool into their training or swing the thing correctly.
Why should I use the steel mace in my training?
Upper-body rotational strength and efficiency are exceptionally underrated in many sports—particularly combat sports.
The rotational forces needed to throw an opponent efficiently during a wrestling match or MMA fight may not be understood by many strength and conditioning coaches. But rotational strength and efficiency are also key for any rotational athlete, including baseball players, tennis players, discus and javelin throwers, shot putters and quarterbacks.
The steel mace is an excellent implement for building strength and mobility in the upper body—the shoulders and core in particular. A move like the 360 Mace Swing, which we’ll cover in just a minute, builds strength in a huge range of motion and helps an athlete learn to control a load in awkward positions. Once you give it a shot, you’ll know exactly what I mean.
While the steel mace is a great pre-hab and rehab device for protecting against or healing shoulder injuries, I believe it’s best used to enhance performance. Using it as a conditioning tool seems to be very effective. The steel mace is not meant to be a limiting test—you’re not going to use the mace to see how much weight you can do one and only one swing with, for example.
But you are going to see how many swings you can get in a minute, three minutes or even five minutes. That is why this tool is excellent for combat athletes, baseball players, quarterbacks and any athlete who utilizes upper-body rotation strength on a repeated basis.
The 360 Mace Swing
The 360 Mace Swing is the essential steel mace exercise. Before we can even allow an athlete to touch a mace, we need to check off a few things to make sure their risk of injury is kept as low as possible. The athlete should begin in this stance:

Feet should be at hip width with the toes pointed slightly outward, The glutes should be tight, forcing the pelvis underneath. The ribcage should be pulled down with tight abs, and the athlete should have enough shoulder mobility to put their hands on the back of their head without breaking any of the previous positions.
Once we have an athlete who has proven capable of setting up in the proper position, we can start examining which weight is best suited for them. For teaching purposes, I suggest the athlete start with a 10-pound mace. This way, they’ll learn how to control a steel mace without risking getting thrown around by the implement’s weight during the movement.
OK, let’s get into the actual swing. You are going to get into your organized position and have your hands grabbing the mace at the base of the handle with your hands right at about navel level.
For simplicity sake, we will work with the easiest way to swing the mace. That would be moving the mace over the opposite ear of the top hand. The three actions of the mace swing are push, relax, pull.
Disclaimer: Your athlete and you should be able to move the mace in both directions no matter which hand is on top. I am only using this example because it is easier to teach a beginner when there are fewer variables.
After you push the mace over the opposite ear, you are going to allow the mace to pendulum behind your back. You’ll then pull the mace back over the opposite ear to return the implement to its starting position. You’ll then switch hands and repeat in the other direction.
The mace should remain as close to your body when it is in front of you as when it is behind you. The best way to think of it is that you are in a narrow corridor with a wall 2 feet behind you and a wall 2 feet in front of you. The head of the mace should never touch either wall at any time during the movement.
The rep/set prescription for a beginner should be either timed sets or rep sets. I prefer to go for the timed sets. Go 1 minute straight in one direction, take a minute of rest, and then repeat in the other direction. Do this for 10 cycles and perform it 2-3 times per week. As you progress, you can either add time to your working sets or subtract time from your rest period. Only move up in weight when you are completely dominating the 10-pound mace with total control.
READ MORE:
RECOMMENDED FOR YOU
MOST POPULAR
The Steel Mace: Why Every Athlete Should Know This Unique Piece of Equipment
My earliest memories of athletic training revolve around conventional equipment. You know, the barbells, dumbbells and weight plates that make up most of today’s weight rooms. I embraced this and became a modestly good powerlifter over time.
It wasn’t until I retired from powerlifting and football that I began to seek other methods of upping my strength and fitness. I was bored of the typical training, and I wanted to save my athletes from having to train the same way all the time. That boredom was a big issue for me as an athlete and may have been the reason I disliked training so much. It just became the same thing day in and day out!
As I searched for “new” tools to train with, I came across what is called a Macebell. This tool, also known as a steel mace, was intimidating, novel and frankly pretty badass. It unlocked a passion in me that I had not had since I stepped away from the gridiron and the platform.
This article is intended to give you a crash course in this unique implement and leave you feeling confident enough to go swing one for yourself!
What is the steel mace?

Before we get into the fun stuff you can do with the steel mace, we should first talk a little bit about what exactly it is. This is a piece of equipment that mimics an implement that’s been used as a training tool in India for centuries. The Pehlwani wrestlers in India train with a device called a Gada. It consists of a bamboo stalk with a concrete ball on the end of it.
Today’s macebells consist of a steel ball welded to an all-steel shaft. They range from as light as 5 pounds all the way up to a massive 55-pound steel mace. The heavier the mace, the longer the shaft.
The tool itself is more readily available than ever because many mainstream companies (such as Onnit) have released their own versions into the market. As far as I’m concerned, this is an excellent thing. The only problem with the widespread availability of the steel mace is that we don’t have enough people to teach athletes how to properly implant the tool into their training or swing the thing correctly.
Why should I use the steel mace in my training?
Upper-body rotational strength and efficiency are exceptionally underrated in many sports—particularly combat sports.
The rotational forces needed to throw an opponent efficiently during a wrestling match or MMA fight may not be understood by many strength and conditioning coaches. But rotational strength and efficiency are also key for any rotational athlete, including baseball players, tennis players, discus and javelin throwers, shot putters and quarterbacks.
The steel mace is an excellent implement for building strength and mobility in the upper body—the shoulders and core in particular. A move like the 360 Mace Swing, which we’ll cover in just a minute, builds strength in a huge range of motion and helps an athlete learn to control a load in awkward positions. Once you give it a shot, you’ll know exactly what I mean.
While the steel mace is a great pre-hab and rehab device for protecting against or healing shoulder injuries, I believe it’s best used to enhance performance. Using it as a conditioning tool seems to be very effective. The steel mace is not meant to be a limiting test—you’re not going to use the mace to see how much weight you can do one and only one swing with, for example.
But you are going to see how many swings you can get in a minute, three minutes or even five minutes. That is why this tool is excellent for combat athletes, baseball players, quarterbacks and any athlete who utilizes upper-body rotation strength on a repeated basis.
The 360 Mace Swing
The 360 Mace Swing is the essential steel mace exercise. Before we can even allow an athlete to touch a mace, we need to check off a few things to make sure their risk of injury is kept as low as possible. The athlete should begin in this stance:

Feet should be at hip width with the toes pointed slightly outward, The glutes should be tight, forcing the pelvis underneath. The ribcage should be pulled down with tight abs, and the athlete should have enough shoulder mobility to put their hands on the back of their head without breaking any of the previous positions.
Once we have an athlete who has proven capable of setting up in the proper position, we can start examining which weight is best suited for them. For teaching purposes, I suggest the athlete start with a 10-pound mace. This way, they’ll learn how to control a steel mace without risking getting thrown around by the implement’s weight during the movement.
OK, let’s get into the actual swing. You are going to get into your organized position and have your hands grabbing the mace at the base of the handle with your hands right at about navel level.
For simplicity sake, we will work with the easiest way to swing the mace. That would be moving the mace over the opposite ear of the top hand. The three actions of the mace swing are push, relax, pull.
Disclaimer: Your athlete and you should be able to move the mace in both directions no matter which hand is on top. I am only using this example because it is easier to teach a beginner when there are fewer variables.
After you push the mace over the opposite ear, you are going to allow the mace to pendulum behind your back. You’ll then pull the mace back over the opposite ear to return the implement to its starting position. You’ll then switch hands and repeat in the other direction.
The mace should remain as close to your body when it is in front of you as when it is behind you. The best way to think of it is that you are in a narrow corridor with a wall 2 feet behind you and a wall 2 feet in front of you. The head of the mace should never touch either wall at any time during the movement.
The rep/set prescription for a beginner should be either timed sets or rep sets. I prefer to go for the timed sets. Go 1 minute straight in one direction, take a minute of rest, and then repeat in the other direction. Do this for 10 cycles and perform it 2-3 times per week. As you progress, you can either add time to your working sets or subtract time from your rest period. Only move up in weight when you are completely dominating the 10-pound mace with total control.
READ MORE:


